Tile Behind Wood Stoves
Tile Behind Wood Stoves | … Heat Shield – How Tile to Special Spaces – Tile & Tiling. DIY Advice
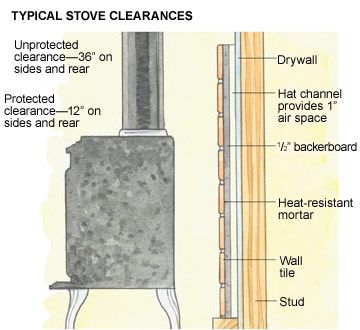
Wood stoves have very specific requirements about how close they can be placed to combustible surfaces. The distance varies by stove, but many stoves are required to be eight to 36 inches away from a combustible wall. Because this often places the stove out into the room, many home owners choose to build a wall shield instead. The most common way of doing this is to tile the wall or a portion of the wall behind the stove.
Remove the Drywall
Drywall is combustible and not a suitable material either for use behind the wood stove or for use underneath tile. Removing it from the wall behind the wood stove allows you to install cement backerboard instead. Cut right through the drywall using a drywall saw. Remove all the drywall from any wall that comes within the eight- to 36-inches recommended by your stove’s manufacturer. For the most seamless appearance, remove the drywall straight to the ceiling, even if you don’t plan on tiling that high. There are some cement backerboards that are paintable, allowing you to install tile as high as you like, and still have a noncombustible surface to the ceiling behind the stove.
Put Up the Backerboard
Backerboard is a concrete-based wallboard that is noncombustible. It installs on walls similarly to drywall. Test-fit the panels on the wall, and cut them by scoring the surface and snapping on the score lines. Screw it to the studs, driving the screw heads just below the surface of the board. Place fiberglass tape on the seams between the different boards, and cover the tape with a layer of thinset mortar — the same material you will use to install the tiles onto the backerboard. You can lay the boards horizontally or vertically in the area, whatever fits best and hides the seams beneath the tile.
Tile the Wall
After the backerboard is up, you can install tile right away. If your hearth already is tiled, and if you are using the same tiles, lay out the wall tiles so the grout joints match on the floor and wall tiles. If the hearth is not tiled, or you are using a different tile, lay out the tiles so you are tiling from the bottom center of the wall out evenly to each side. Lay the tiles in thinset mortar troweled onto the wall, then tap them in with a rubber mallet. Let the tiles dry for 24 hours.
Grout and Paint
Once the mortar has cured for 24 hours, you can grout the tiles to finish the installation. Pack the grout between the tiles using a grout float. Move the float over the tiles from several angles to ensure good coverage, then clean the surface of the tiles well with a damp sponge. Let the grout dry for 24 hours. You can paint any exposed backerboard to match the surrounding walls at this time. Once the grout and paint are dry, your wall now is noncombustible, and you can use your wood stove safely.